Have you ever thought that something was missing from Publisher, and wanted to know how to add it? Or have you browsed through the Add-ins page and wondered how you could make your own? Well, this article will show you how.
To follow along with this
article, you will need:
- Microsoft Publisher 2002 or 2003
- Microsoft Visual Basic 6.0
- Some knowledge of coding using Visual Basic, and of how to use the VB
IDE
You can also use Visual C++ to write add-ins, but I can't, so we're stuck with VB for now. I believe you may be able to use VS.net and/or the Visual Studio Tools for Office, too, but I have had limited (well, no) success.
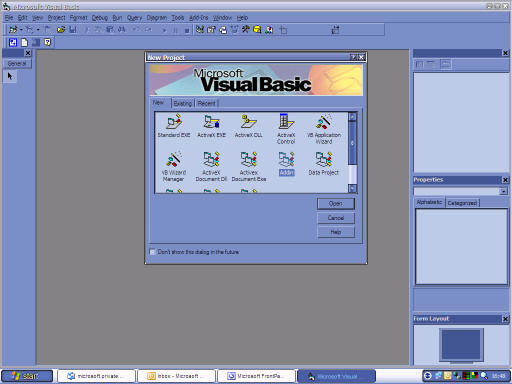
To start off, we need to open Visual Basic. When the welcome dialog appears (select New Project from the File menu if you have the welcome screen disabled), double-click on Add-in.
In the Project Explorer, expand the "Designers" folder, and double-click Connect (Connect). Fill in the details of your add-in in the resulting dialog.
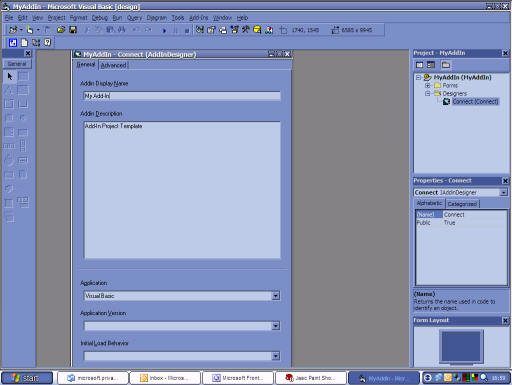
Now, the Add-in template assumes you want to create an add-in for Visual Basic, which you don't. So change "Application" to Microsoft Publisher. Change "Application Version" to suit your target audience - "Microsoft Publisher 10.0" for Publisher 2002 or later, or "Microsoft Publisher 11.0" for Publisher 2003. You may only see one of these, depending on the number of versions of Publisher you have installed.
Now, because the Add-in template is designed for Visual Basic add-ins, it creates a load of code that is useless for Publisher add-ins. So click the Connect (Connect) icon in the Project Explorer, and then click the View Code button. This will give you a dialog like this:

Now, because this code is useless for a Publisher add-in, select it all and delete it. (Ctrl-A for Select All, and Delete to delete it.)
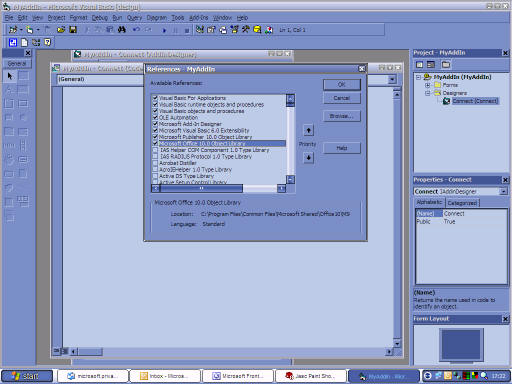
Before we start coding, we need to tell Visual Basic that we will be working with the Publisher and Office object models, so go to Project > References. If you are writing for Publisher 2002 or later, make sure that the "Microsoft Office 10.0 Object Library" and the "Microsoft Publisher 10.0 Object Library" are selected. If you are writing for Publisher 2003 exclusively, make sure that the "Microsoft Office 11.0 Object Library" and the "Microsoft Office Publisher 2003 Object Library" are selected. I will assume that we are writing for Publisher 2002 or later here.
So now we can start writing some code. Now, assuming you want
the user to interact with this add-in, we are probably going to need
a toolbar for the add-in to place its icons on (you could use a menu
or menu item, but it's easier to use a toolbar for now). To
tell the compiler that we want to dimension all variables ourselves
(to avoid misnaming variables) we use the "Option Explicit" command,
and then we define a variable as type Office.CommandBar
Option ExplicitDim cbAddins as Office.CommandBar
Now, we have a toolbar, but we need a button to go on it. And, seeing as we want the button to respond when it's clicked, we need to designate it as WithEvents
Dim WithEvents cbbMyButton as Office.CommandBarButton
Now we've declared all the variables we need (if we needed more buttons, we could add them here, and if we were dealing with shapes on a regular basis, we could define some shape objects to hold them.
The first event procedure we will write is for when the add-in is initialised - when it is added to the application (either via Tools > Add-ins or when the application is started). This is called by the OnConnect event of the AddinInstance object
Private Sub AddinInstance_OnConnection(ByVal Application As Object, ByVal ConnectMode As AddInDesignerObjects.ext_ConnectMode, ByVal AddInInst As Object, custom() As Variant)
Don't worry about learning how that line was made - you can just click the left drop-down at the top and click "AddinInstance" and it will automatically create that subroutine by default. You don't need to worry about the various parameters being passed to it, as that is all handled by Publisher when the add-in is initialised.
The first step is to check whether the toolbar already exists. We'll be adding our icon to an "Add-ins" toolbar in this example, as a whole toolbar for one icon is a little extravagant, and in all my add-ins (on the Add-ins page) that use one icon only all add themselves to the Add-ins toolbar. The way I check if the toolbar exists is to assign the toolbar to the variable, and if it returns nothing (or an error) to create the toolbar.
On Error Resume Next
Set cbAddins = Publisher.CommandBars("Add-ins")
If Not Err.Number = 0 then
Set cbAddins = Publisher.CommandBars.Add
cbAddins.Name = "Add-ins"
Err.Clear
End If
If cbAddins Is Nothing Then
Set cbAddins = Publisher.CommandBars.Add
cbAddins.Name = "Add-ins"
End If
Now using a similar method we can check if our button already
exists, and if not, create it. We also create a variable to
let us know whether we had to create the button or not.
Dim HadToCreate As Boolean
HadToCreate = False
Set cbbMyButton = cbAddins.Controls("MyButton")
If Not Err.Number = 0 then
Set cbbMyButton = cbAddins.Controls.Add
cbbMyButton.Caption = "MyButton"
HadToCreate = True
Err.Clear
End If
If cbbMyButton Is Nothing Then
Set cbbMyButton = cbAddins.Controls.Add
cbbMyButton.Caption = "MyButton"
HadToCreate = True
End If
Now, we use the contents of HadToCreate to determine
whether or not we need to set the properties of the button.
And if we do, we set the toolbar to be visible (to show the user
that there's a new icon on it if they had it hidden) and we set the
icon of the button to be number 31, which looks like this
![]() .
For details on how to find icons and their corresponding FaceIDs,
click here.
.
For details on how to find icons and their corresponding FaceIDs,
click here.
If HadToCreate = True Then
cbAddins.Visible = True
cbbMyButton.FaceID = 31
End If
You may be wondering why we didn't just set the properties regardless of whether we had had to create the button or not. Well, that would be annoying for the user - they may have customised their button with a custom icon, and so having this removed every time the add-in was connected would annoy them just a little.
That's all we have to do to create our button. But now we have to get the button to respond to an event. Because we declared the toolbar button as WithEvents, we can do this with the cbbMyButton_Click event.
Private Sub cbbMyButton_Click(ByVal Ctrl As Office.CommandBarButton, CancelDefault As Boolean)
Again, Publisher will handle all of the arguments, and this subroutine can again be created automatically by clicking the left combobox at the top of the code window and clicking "cbbMyButton".
For the purposes of this article, we will get the button to add a circle of diameter 2.5" in the corner of the active page of the first document to be opened (click here for an explanation of why that is).
ActiveDocument.ActiveView.ActivePage.Shapes.AddShape msoShapeOval, 0, 0, "2.5 in", "2.5 in"
That is all we need in that subroutine (if we had wanted, we could have defined a variable of type Publisher.Shape and manipulated its properties, but we won't do that now).
Now we need to handle what will happen if the user removes the
add-in from Publisher. This is handled with the
OnDisconnection event.
Private Sub AddinInstance_OnDisconnection(ByVal RemoveMode As AddInDesignerObjects.ext_DisconnectMode, custom() As Variant)
This can be added added automatically - but if we click "AddinInstance" on the left-hand combobox, we are directed to the "OnConnection" event. So we can go to the right-hand combobox, and click "OnDisconnection", and our subroutine is added for us.
Now, we don't want to remove the toolbar, as
other add-ins could be using it. And we only want to remove
the button if the add-in is being removed from Publisher - but the
OnDisconnection event is also triggered when Publisher is closed.
So we take the RemoveMode parameter - this specifies whether the
add-in is being removed because Publisher is being closed, or
because the add-in is being removed. It gives 1 if the add-in
is being removed from Publisher. This gives us the following
code:
On Error Resume Next
If RemoveMode = 1 Then
Publisher.CommandBars("Add-ins").Controls("MyButton").Delete
End If
We add the On Error Resume Next statement as if the button had already been deleted, the delete statement would raise an error - but we don't mind if it does, because we are just making sure that the button doesn't exist.
So, when all of that code is put together, we get the following:
Option Explicit
Dim cbAddins As Office.CommandBar
Dim WithEvents cbbMyButton As Office.CommandBarButton
Private Sub AddinInstance_OnConnection(ByVal Application As Object, ByVal ConnectMode As AddInDesignerObjects.ext_ConnectMode, ByVal AddInInst As Object, custom() As Variant)
On Error Resume Next
Set cbAddins = Publisher.CommandBars("Add-ins")
If Not Err.Number = 0 Then
Set cbAddins = Publisher.CommandBars.Add
cbAddins.Name = "Add-ins"
Err.Clear
End If
If cbAddins Is Nothing Then
Set cbAddins = Publisher.CommandBars.Add
cbAddins.Name = "Add-ins"
End If
Dim HadToCreate As Boolean
HadToCreate = False
Set cbbMyButton = cbAddins.Controls("MyButton")
If Not Err.Number = 0 Then
Set cbbMyButton = cbAddins.Controls.Add
cbbMyButton.Caption = "MyButton"
HadToCreate = True
Err.Clear
End If
If cbbMyButton Is Nothing Then
Set cbbMyButton = cbAddins.Controls.Add
cbbMyButton.Caption = "MyButton"
HadToCreate = True
End If
If HadToCreate = True Then
cbAddins.Visible = True
cbbMyButton.FaceId = 31
End If
End Sub
Private Sub AddinInstance_OnDisconnection(ByVal RemoveMode As AddInDesignerObjects.ext_DisconnectMode, custom() As Variant)
On Error Resume Next
If RemoveMode = 1 Then
Publisher.CommandBars("Add-ins").Controls("MyButton").Delete
End If
End Sub
Private Sub cbbMyButton_Click(ByVal Ctrl As Office.CommandBarButton, CancelDefault As Boolean)
ActiveDocument.ActiveView.ActivePage.Shapes.AddShape msoShapeOval, 0, 0, "2.5 in", "2.5 in"
End Sub
And that's all there is to it! That sample add-in is available here for you to use as a template for making your own add-in (subject to the terms and conditions of the EULA). This screenshot shows the add-in toolbar present, and the circle created (just to prove that it does work).

Of course, once you have finished your add-in you will want to set the project properties as you would with any other project.
If you are looking for some more sample code to help you understand add-ins and the object model, there is a rudimentary version of the Default Text Box add-in with documented sample code available at MSDN here.
And of course, to write your own add-in you will need to know a little about Publisher's object model (which it is impossible to explain in an article like this). A map of the Publisher Object Model, along with explanations of what everything does, can be found in the Microsoft Publisher Visual Basic Help Files. These are at the following path:
c:\Program Files\Microsoft Office\Office10\<langid>\VBAPB10.chm
Where "c:\Program Files\Microsoft Office" is assumed to be your Publisher install directory. "Office10" is replaced with "Office11" for Publisher 2003 and "Office12" for 2007 Microsoft Publisher. "<LangID>" is replaced with your version of Office's language ID (for an English-language version of Office, this is 1033).